Low back pain is the leading cause of disability worldwide, according to the Global Burden of Disease Study. In the United States alone, Americans spend over $50 billion per year treating back pain. The majority of these cases are mechanical, meaning the pain comes from muscles, ligaments, joints, and discs rather than from a serious underlying disease.
Sitting drives much of the problem. The average American adult sits for 6.5 hours per day. Prolonged sitting compresses your lumbar discs, tightens your hip flexors, weakens your glutes, and shortens the muscles along the front of your body. Over months and years, these imbalances create chronic tension, stiffness, and pain in your lower and upper back.
Yoga addresses back pain through three mechanisms. First, specific poses stretch shortened, tight muscles that pull your spine out of alignment. Second, certain poses strengthen the muscles supporting your spine, improving stability. Third, the breathing patterns practiced during yoga activate your parasympathetic nervous system, reducing the muscle guarding and tension that worsen pain.
The evidence supports this approach. A 2017 systematic review published in the Annals of Internal Medicine analyzed 12 randomized controlled trials involving 1,080 participants. The American College of Physicians now recommends yoga as a first-line treatment for chronic low back pain, ahead of medication. A separate study in the Archives of Internal Medicine found yoga reduced pain intensity by 48% and functional disability by 42% after 12 weeks of practice.
These ten poses target the most common sources of back pain. Each section explains the anatomy involved, the research behind the pose, step-by-step instructions, modifications for different ability levels, and specific cautions. You do not need prior yoga experience. You need a mat or a carpeted floor and 15 to 20 minutes.

Cat-Cow Stretch
Marjaryasana-Bitilasana
Cat-Cow is the single best warm-up for a stiff back. The pose moves your spine through its two primary ranges of motion, flexion (rounding) and extension (arching), in a slow, controlled rhythm. This alternating movement lubricates the facet joints along your vertebral column, increases circulation to the spinal discs, and releases tension in the muscles running parallel to your spine (the erector spinae group).
Your spinal discs have no direct blood supply. They receive nutrients through a process called imbibition, where movement creates a pumping action drawing fluid into the disc tissue. Prolonged sitting eliminates this pumping action. Your discs dehydrate and lose height throughout the day, which is why you are slightly shorter in the evening than you are in the morning. Cat-Cow restores the pumping action and rehydrates your discs.
A 2015 study published in the Journal of Physical Therapy Science tested spinal flexion-extension exercises (the same movement pattern as Cat-Cow) on 30 patients with chronic low back pain. After 4 weeks of daily practice, participants showed significant improvement in pain levels, spinal mobility, and functional ability. The control group showed no improvement.
Cat-Cow also addresses the thoracic spine, the mid-back region that stiffens severely with prolonged computer work. When your thoracic spine loses mobility, your lumbar spine compensates by moving more than the segment is designed to move. This compensation is a primary cause of low back pain in desk workers. Cat-Cow restores thoracic mobility and reduces the burden on your lower back.
How to Perform Cat-Cow
- Start on your hands and knees. Place your wrists directly under your shoulders. Place your knees directly under your hips. Spread your fingers wide. Press evenly through your palms.
- Cow phase: Inhale slowly. Drop your belly toward the floor. Lift your sitting bones upward. Lift your chest forward and up. Look slightly ahead, not straight up. Let the arch travel from your tailbone through your lower back, middle back, and upper back in a wave-like sequence. Do not dump all the extension into your lower back. Distribute the movement across your entire spine.
- Cat phase: Exhale slowly. Round your spine toward the ceiling. Tuck your tailbone under. Draw your belly button toward your spine. Let your head drop naturally. Look toward your navel. Press the floor away with your hands to create maximum rounding through your upper back.
- Move between these two positions slowly. One full cycle (cow to cat) should take 4 to 6 seconds. Match the movement to your breath. Inhale into cow. Exhale into cat.
- Repeat for 8 to 12 cycles. Move slowly and deliberately. Speed reduces the benefit.
Modifications
- If your wrists hurt: Make fists and balance on your knuckles instead of flat palms. Or place your forearms flat on the floor (this shifts weight off the wrists while maintaining the spinal movement).
- If your knees are sensitive: Place a folded blanket or towel under your kneecaps for extra padding.
- Seated variation: Sit in a chair with feet flat on the floor. Place your hands on your knees. Perform the same arching and rounding motion with your spine. This version works at your office desk without getting on the floor.
Child’s Pose
Balasana
Child’s Pose creates gentle traction in your lumbar spine. When you sit your hips back toward your heels and reach your arms forward, the distance between your lumbar vertebrae increases slightly. This decompression reduces pressure on spinal discs and spinal nerves, providing immediate relief for compression-related pain.
The pose also lengthens the paraspinal muscles, the muscles running along both sides of your spine from your skull to your pelvis. These muscles become chronically tight in people who sit for extended periods. When the paraspinal muscles are tight, they compress your vertebrae together and restrict spinal movement. Child’s Pose stretches these muscles passively, meaning you hold the position and let gravity do the work rather than actively forcing the stretch.
The forward fold position activates your parasympathetic nervous system. A study published in the Journal of Alternative and Complementary Medicine measured autonomic nervous system activity during various yoga poses. Forward folds, including Child’s Pose, increased parasympathetic (rest-and-digest) activity and decreased sympathetic (fight-or-flight) activity within 60 seconds. This neurological shift reduces muscle guarding, the reflexive tightening that your nervous system triggers in response to pain. Muscle guarding protects injured tissue in the short term but perpetuates chronic pain when the tightening persists after the initial injury heals.
Child’s Pose also stretches the latissimus dorsi muscles, the large muscles spanning from your lower back to your upper arms. Tight lats pull on the thoracolumbar fascia, a dense sheet of connective tissue covering your lower back. This pulling creates tension and stiffness across your entire lower back. Reaching your arms forward in Child’s Pose lengthens the lats and releases this fascial tension.
How to Perform Child’s Pose
- Kneel on your mat. Bring your big toes together. Separate your knees to hip-width distance or slightly wider. Wider knees create more space for your torso and allow a deeper forward fold.
- Sit your hips back toward your heels. If your hips do not reach your heels, that is fine. Go as far as comfortable.
- Walk your hands forward along the mat. Extend your arms fully. Spread your fingers. Press your palms gently into the floor.
- Lower your forehead to the mat. If your forehead does not reach the floor, place a folded towel or yoga block under your forehead. Supporting your head allows your neck muscles to relax completely.
- Breathe slowly and deeply. With each exhale, allow your hips to sink slightly closer to your heels. Allow your chest to melt slightly closer to the floor. Do not force either movement. Let gravity create the stretch over time.
- Hold for 30 seconds to 2 minutes. Longer holds produce deeper muscle release. The fascia requires sustained pressure (at least 90 seconds) to begin remodeling.
Modifications
- If your hips do not reach your heels: Place a rolled towel or pillow between your calves and the backs of your thighs. This props support the gap and lets your back muscles relax fully.
- If you feel pressure on your knees: Place a folded blanket behind your knee joints (in the crease between your thigh and calf). This reduces the degree of knee flexion and decreases joint compression.
- For a wider stretch: Spread your knees wider than hip-width. This variation targets the inner groin and adductors in addition to the lower back.
- For a side stretch: Walk both hands to the right side of your mat while keeping your hips centered. Hold for 30 seconds. Walk your hands to the left side. This variation stretches the quadratus lumborum (QL), a deep muscle connecting your last rib to your pelvis. A tight QL is one of the most common causes of unilateral (one-sided) low back pain.
Downward-Facing Dog
Adho Mukha Svanasana
Downward-Facing Dog is one of the most comprehensive poses for back pain. The inverted V-shape creates traction along your entire spine while simultaneously stretching your hamstrings, calves, shoulders, and the fascial chain running along the back of your body.
Tight hamstrings are a leading contributor to lower back pain. Your hamstrings attach to your ischial tuberosities (sitting bones) at the base of your pelvis. When these muscles shorten from prolonged sitting, they tilt your pelvis posteriorly (tucking your tailbone under). This posterior tilt flattens the natural lordotic curve of your lumbar spine, increasing pressure on your lumbar discs. A study in the Clinical Journal of Sport Medicine found that people with chronic low back pain had significantly tighter hamstrings than pain-free controls. Downward Dog stretches the hamstrings under load, gradually restoring length to these muscles and allowing your pelvis to return to a neutral position.
The pose also decompresses the spine through axial traction. In Downward Dog, gravity pulls your torso away from your hips, creating space between your vertebrae. A 2014 study in the Asian Journal of Sports Medicine measured spinal decompression during inversion-type exercises and found reduced intradiscal pressure and increased intervertebral space. Downward Dog achieves a partial inversion effect without the equipment or risks of full inversion.
The weight-bearing through your arms strengthens the muscles stabilizing your shoulder blades (serratus anterior, lower trapezius, and rotator cuff). Weak scapular stabilizers allow your shoulders to round forward, creating the upper back tension and thoracic kyphosis (rounded mid-back) common in desk workers. Strengthening these muscles pulls your shoulders back and reduces compensatory strain on your lower back.
How to Perform Downward-Facing Dog
- Start on your hands and knees. Place your hands shoulder-width apart. Spread your fingers wide. Place your knees hip-width apart.
- Tuck your toes under. On an exhale, lift your knees off the floor. Push your hips up and back toward the ceiling. Straighten your legs gradually. Your body should form an inverted V-shape.
- Press your hands firmly into the mat. Rotate your upper arms outward so your elbow creases face forward. This external rotation engages your rotator cuff muscles and creates stability in the shoulder joint.
- Push your chest gently toward your thighs. Lengthen your spine. Think about creating maximum distance between your hands and your hips. Your spine should be straight, not rounded. If rounding occurs, bend your knees slightly to maintain a flat back. A flat back with bent knees is better for your spine than straight legs with a rounded back.
- Let your head hang naturally between your upper arms. Do not crane your neck to look forward. Your ears should align with your upper arms.
- Press your heels toward the floor. They do not need to touch. The reaching action stretches your calves and Achilles tendons. Over time, your heels will lower as flexibility improves.
- Hold for 30 seconds to 1 minute. Breathe steadily. With each exhale, press your hips slightly higher and your chest slightly closer to your thighs.
Modifications
- If your hamstrings are very tight: Bend your knees generously. Keep your spine long and flat. Straightening the legs at the expense of a rounded spine defeats the purpose. Prioritize spinal length over leg straightness.
- If your wrists hurt: Place your forearms flat on the floor instead of your hands (Dolphin Pose). This variation provides the same spinal stretch and hamstring lengthening without wrist compression.
- If the pose feels too intense: Place your hands on a chair seat or a low table instead of the floor. This reduces the angle and decreases the load on your upper body while maintaining the spinal traction effect.
- Pedal your feet: Alternate bending one knee while straightening the other. This dynamic variation stretches each hamstring and calf individually and feels less intense than holding the static position with both legs straight.
Supine Twist
Supta Matsyendrasana
Spinal rotation is the movement pattern most neglected in daily life. You flex and extend your spine when you bend forward and sit up. You side-bend occasionally when reaching for something. But rotational movement rarely occurs in a full range of motion during normal activities. The muscles and joints responsible for rotation stiffen accordingly.
The supine twist takes your spine through gentle rotation while fully supported by the floor. This support eliminates the compressive load that standing or seated twists place on your discs, making the supine twist the safest rotational exercise for people with existing back pain.
The primary muscles stretched during the supine twist are the external and internal obliques, the quadratus lumborum, the piriformis, and the spinal rotators (multifidi and rotatores). The multifidi are small, deep muscles connecting adjacent vertebrae. These muscles are responsible for fine-tuned spinal stability and rotational control. Research published in Spine found that people with chronic low back pain showed significant atrophy (shrinkage) of the multifidi on the painful side. The supine twist engages and stretches the multifidi, stimulating blood flow and promoting recovery of these atrophied muscles.
The twist also stretches the iliotibial band (IT band) and the tensor fasciae latae (TFL), structures running along the outside of your hip and thigh. Tightness in the IT band and TFL creates a lateral pull on your pelvis, contributing to lower back asymmetry and pain. The twist addresses this lateral tension directly.
A 2016 study in the Journal of Back and Musculoskeletal Rehabilitation tested spinal rotation exercises on 64 patients with chronic nonspecific low back pain. After 8 weeks, the rotation exercise group showed significantly greater improvement in pain levels, disability scores, and range of motion compared to a general exercise group.
How to Perform the Supine Twist
- Lie on your back on your mat. Extend both arms out to the sides at shoulder height, palms facing down. Your body forms a T-shape.
- Bend both knees and place your feet flat on the floor, hip-width apart.
- On an exhale, slowly lower both knees to the right side. Keep your knees together. Allow them to rest on the floor or as close to the floor as comfortable.
- Turn your head to the left, looking over your left hand. This creates a counter-rotation through your cervical spine, adding a gentle stretch to your neck.
- Keep both shoulder blades pressing into the floor. Your left shoulder will want to lift as your knees drop right. Resist this lifting. If your left shoulder lifts significantly, your knees have gone too far. Bring them back slightly until both shoulders rest on the floor.
- Breathe deeply. Hold the position for 30 seconds to 2 minutes. With each exhale, allow your knees to settle slightly closer to the floor. Do not push. The weight of your legs provides enough force. Gravity does the work.
- On an inhale, engage your core gently and bring your knees back to center.
- Repeat on the left side. Hold for the same duration.
Modifications
- If your knees do not reach the floor: Place a pillow or folded blanket between your knees and the floor. Supporting the weight of your legs allows your back muscles to relax fully into the twist.
- For a deeper hip stretch: Cross your right ankle over your left knee before dropping both legs to the left. This variation adds a figure-four stretch targeting the piriformis muscle. A tight piriformis compresses the sciatic nerve and creates pain radiating from the buttock down the leg.
- For a gentler version: Keep your feet on the floor and rock your knees side to side in a windshield-wiper motion. This dynamic version moves your spine through a smaller range of rotation and serves as a warm-up before the static hold.
Bridge Pose
Setu Bandhasana
Bridge Pose is one of the most effective strengthening poses for low back pain. The pose targets your gluteus maximus, the largest muscle in your body and the primary hip extensor. Weak glutes are a root cause of chronic low back pain. When your glutes fail to do their job during walking, standing, and lifting, your lower back muscles compensate. These smaller muscles are not designed for the workload and break down over time.
A 2007 study in the Journal of Electromyography and Kinesiology coined the term “gluteal amnesia” to describe the pattern of gluteal inhibition that occurs with prolonged sitting. When you sit, your hip flexors shorten and your glutes lengthen. After hours of daily sitting for months and years, the neural connection between your brain and your glutes weakens. Your brain stops recruiting the glutes efficiently, even during activities where the glutes should be the primary movers. Bridge Pose re-establishes this neural connection by isolating the glutes in a controlled movement.
The pose simultaneously stretches your hip flexors (iliopsoas and rectus femoris). Tight hip flexors pull your pelvis into anterior tilt, creating excessive curvature in your lumbar spine (hyperlordosis). This increased curve compresses the posterior elements of your lumbar vertebrae and narrows the spinal canal. Bridge Pose opens the front of your hips while strengthening the back, restoring pelvic balance.
A study published in the Journal of Orthopaedic and Sports Physical Therapy analyzed muscle activation during the bridge exercise using EMG. The researchers found that the bridge produced high-level activation of the gluteus maximus (average 25% of maximum voluntary isometric contraction) while producing low compressive load on the lumbar spine. This combination of high muscle engagement and low spinal stress makes the bridge one of the safest and most effective exercises for back pain rehabilitation.
How to Perform Bridge Pose
- Lie on your back. Bend your knees and place your feet flat on the floor, hip-width apart. Walk your feet close to your buttocks. You should be able to touch your heels with your fingertips.
- Place your arms alongside your body, palms facing down. Press your arms and palms into the floor for stability.
- Press your feet firmly into the floor. On an inhale, lift your hips off the floor. Roll up one vertebra at a time, starting from your tailbone and progressing through your lower back, middle back, and upper back. This sequential rolling motion mobilizes each spinal segment individually.
- At the top position, your body should form a straight line from your shoulders to your knees. Do not push your hips so high that your lower back hyperextends. The goal is a neutral spine, not a backbend.
- Squeeze your glutes firmly at the top. You should feel the work primarily in your buttocks, not in your lower back. If you feel your lower back muscles working harder than your glutes, you have lifted too high. Lower slightly and re-engage your glutes.
- Keep your knees parallel. They tend to splay outward or collapse inward. Both deviations reduce glute activation and increase stress on your knees and SI joints.
- Hold for 5 to 10 breaths (20 to 40 seconds). Lower slowly, rolling down one vertebra at a time from upper back to tailbone.
- Repeat 3 to 5 times.
Modifications
- For more support: Place a yoga block under your sacrum (the flat triangular bone at the base of your spine) and rest your weight on the block. This supported version provides the hip flexor stretch without requiring glute strength. Hold for 1 to 3 minutes.
- For more challenge: At the top of the bridge, extend one leg straight forward. Hold for 5 breaths. Switch legs. The single-leg bridge increases glute activation by 40% compared to the bilateral version, according to EMG studies.
- For spinal mobility: Instead of holding at the top, perform slow roll-ups and roll-downs continuously. Focus on peeling each vertebra off the floor individually. This variation emphasizes segmental spinal mobility over strength.
Sphinx Pose
Salamba Bhujangasana
Sphinx Pose is a gentle spinal extension exercise that targets the health of your lumbar discs directly. The pose is based on the McKenzie extension principle, a physical therapy approach developed by New Zealand physiotherapist Robin McKenzie in the 1960s. The McKenzie method remains one of the most widely used and evidence-supported treatments for disc-related back pain worldwide.
The principle is straightforward. Most disc herniations occur posteriorly (toward the back of the spine). When you sit or bend forward, the nucleus pulposus (the gel-like center of your disc) migrates posteriorly, pressing against the outer fibers of the annulus fibrosus and potentially compressing spinal nerves. Gentle extension (backward bending) pushes the nucleus pulposus anteriorly (toward the front of the spine), away from the posterior nerve structures. This migration reduces disc pressure on the nerve and decreases pain.
A 2006 systematic review in the journal Spine analyzed 6 randomized controlled trials of the McKenzie method for low back pain. The review found the McKenzie approach produced significant short-term improvements in pain and disability. A more recent study in the Journal of Orthopaedic and Sports Physical Therapy confirmed that directional preference exercises (like extension for posterior disc herniations) produced clinically meaningful improvements in 74% of patients with acute low back pain.
Sphinx Pose is the gentlest version of prone extension. Unlike Cobra Pose or full backbends, Sphinx keeps your forearms on the floor, limiting the degree of extension to a safe range for beginners and people with acute pain. The pose creates approximately 20 to 30 degrees of lumbar extension, enough to produce the disc migration effect without overloading the posterior spinal structures.
The pose also strengthens the erector spinae muscles in a shortened position, building endurance in the muscles responsible for maintaining upright posture. A study in Clinical Biomechanics found that people with chronic low back pain had significantly lower erector spinae endurance than pain-free controls. Improving this endurance reduced pain recurrence.
How to Perform Sphinx Pose
- Lie face down on your mat. Extend your legs behind you, hip-width apart. The tops of your feet rest on the floor.
- Place your elbows directly under your shoulders. Your forearms rest on the mat, parallel to each other, pointing forward.
- On an inhale, press your forearms gently into the mat and lift your head and chest. Your pelvis and legs remain on the floor. Your lower ribs stay in contact with the mat.
- Draw your shoulder blades down your back and together. This engages the lower trapezius and rhomboids, muscles that counteract the rounded-shoulder posture of desk work.
- Look straight ahead. Keep your neck long and neutral. Do not crane your head backward.
- Engage your lower abdominal muscles lightly. Draw your belly button gently away from the floor. This co-contraction of your abdominals and back extensors creates spinal stability and prevents excessive compression in your lower lumbar segments.
- Hold for 30 seconds to 2 minutes. Breathe steadily. With each inhale, lengthen your spine slightly. With each exhale, settle into the position without collapsing.
- To release, exhale and slowly lower your chest and head to the floor. Turn your head to one side. Rest for a few breaths before repeating or moving to the next pose.
Modifications
- If the extension feels too intense: Slide your elbows slightly forward of your shoulders. This reduces the angle of extension and decreases the load on your lower back. Find the elbow position where you feel a comfortable stretch without pain.
- For a dynamic version: Slowly press up into Sphinx and lower back down to the floor. Repeat 10 times. This “press-up” version is the classic McKenzie exercise prescribed by physical therapists for disc-related pain. Perform 10 repetitions every 2 to 3 hours during the acute phase of a disc flare-up.
- For more intensity: Once Sphinx feels comfortable, progress to Cobra Pose (hands under shoulders, arms partially straightened). Cobra provides greater extension. Only progress when Sphinx produces no pain.
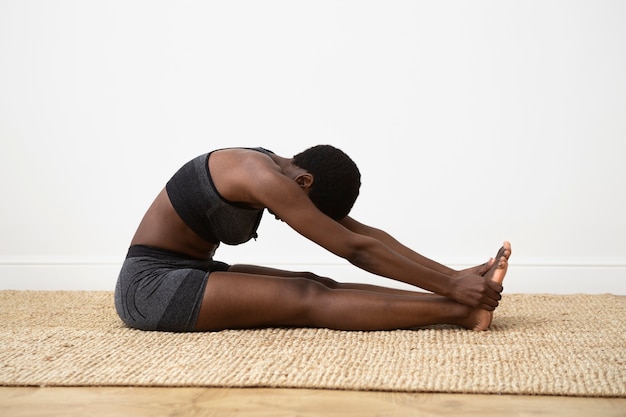
Standing Forward Bend
Uttanasana
Standing Forward Bend stretches your entire posterior chain, the interconnected network of muscles and fascia running from the soles of your feet, through your calves, hamstrings, glutes, and lower back, up to the base of your skull. This fascial line, described by anatomist Thomas Myers as the “Superficial Back Line,” operates as a single functional unit. Tension anywhere along this line affects every other point in the chain.
When you bend forward from a standing position, gravity assists the stretch. Your upper body weight provides gentle traction on your lumbar spine and hamstrings without requiring muscular effort. This passive quality makes the forward bend a true release rather than a forced stretch.
A study published in the Journal of Physical Therapy Science measured the effects of standing forward bend exercises on 30 adults with chronic low back pain. After 4 weeks of daily practice, participants showed significant improvements in lumbar flexion range of motion, hamstring flexibility, and pain severity scores. The improvements in hamstring flexibility correlated directly with reductions in pain, confirming the hamstring-low back pain connection.
The inverted position of the forward bend also increases blood flow to your brain and face. While the cardiovascular effect is transient, the shift in blood pressure triggers a baroreceptor reflex that slows your heart rate and reduces sympathetic nervous system activity. Many people report a noticeable calming effect after holding a forward bend for 30 seconds or longer.
Forward bending also stretches the thoracolumbar fascia, a diamond-shaped connective tissue structure covering your lower back. This fascia is richly innervated with nociceptors (pain receptors). When the thoracolumbar fascia becomes dehydrated, stiff, or adhered to underlying muscle tissue, the nociceptors fire more readily, creating back pain even in the absence of structural damage. Gentle, sustained forward bending rehydrates the fascia and breaks up adhesions.
How to Perform Standing Forward Bend
- Stand with your feet hip-width apart. Distribute your weight evenly across both feet.
- Soften your knees slightly. Do not lock your knee joints. A micro-bend in your knees protects your hamstring attachments and allows your pelvis to tilt forward freely.
- On an exhale, hinge forward from your hip joints (not from your waist). Imagine your pelvis tipping forward like a bowl pouring water. This hip-hinge pattern places the stretch on your hamstrings rather than straining your lower back ligaments.
- Let your arms, head, and torso hang freely. Do not try to touch the floor. Let gravity pull your upper body toward the ground. Your hands will fall wherever your flexibility allows, whether to your shins, your ankles, or the floor.
- Relax your neck completely. Let your head hang heavy. Nod your head gently yes and no to confirm your neck muscles are released.
- Hold for 30 seconds to 1 minute. Breathe slowly. With each exhale, release a small amount of additional tension. Do not bounce or force the stretch deeper. Passive release produces better results than active forcing.
- To come up, bend your knees generously. Engage your core. Roll up slowly, stacking one vertebra at a time. Your head comes up last. Rising slowly prevents the dizziness that occurs from a sudden position change.
Modifications
- If you feel strain in your lower back: Bend your knees more. There is no minimum degree of leg straightness required for this pose to be effective. Deeply bent knees with a relaxed, hanging spine provide the same fascial release and spinal traction as straight legs.
- Ragdoll variation: Grab opposite elbows with your hands while hanging forward. This adds weight to the traction and provides a comfortable position for your arms.
- Wall variation: Stand with your back against a wall. Walk your feet 12 inches from the wall. Slide your back down the wall as you fold forward. The wall provides support and feedback for your spinal alignment during the fold.
- For decompression: At the bottom of the fold, shake your head gently side to side. This releases residual tension in the suboccipital muscles at the base of your skull, muscles that tighten during screen work and headache episodes.
Pigeon Pose
Eka Pada Rajakapotasana
Pigeon Pose is the most effective yoga pose for releasing the deep external rotators of the hip, particularly the piriformis muscle. The piriformis is a small, flat muscle located deep in the buttock, running from the sacrum (the triangular bone at the base of your spine) to the greater trochanter of your femur (the bony point on the outside of your hip). The sciatic nerve runs directly beneath the piriformis in most people. In approximately 17% of the population, the sciatic nerve passes directly through the piriformis muscle belly.
When the piriformis tightens or spasms, the muscle compresses the sciatic nerve, creating a condition called piriformis syndrome. Symptoms include pain in the buttock, pain radiating down the back of the leg, numbness, and tingling. Piriformis syndrome is frequently misdiagnosed as lumbar disc herniation because the symptoms are similar. A study in the Journal of the American Academy of Orthopaedic Surgeons estimated that piriformis syndrome accounts for 6 to 8% of all cases of low back and leg pain.
Sitting for extended periods keeps the piriformis in a shortened position. Running, cycling, and climbing stairs without adequate stretching cause the piriformis to tighten further. The muscle becomes hypertonic (chronically tight), compressing the sciatic nerve and pulling on the sacrum, creating sacroiliac joint dysfunction and lower back pain.
Pigeon Pose places the piriformis in a deep, sustained stretch. The pose also stretches the other deep external rotators (gemelli, obturator internus, obturator externus, and quadratus femoris), the hip flexors of the back leg (iliopsoas and rectus femoris), and the gluteus medius. This comprehensive hip opening reduces the tension pulling on your lower back from multiple directions.
A study published in the International Journal of Sports Physical Therapy tested a piriformis stretching protocol on patients with piriformis syndrome. After 3 weeks of daily stretching, 79% of participants reported significant pain reduction. Range of motion in hip external rotation increased by an average of 12 degrees.
How to Perform Pigeon Pose
- Start in a tabletop position (hands and knees) or Downward-Facing Dog.
- Bring your right knee forward toward your right wrist. Place your right shin on the floor at an angle. Your right foot moves toward your left wrist. The angle of your shin determines the intensity of the stretch. A shin closer to parallel with the front of the mat creates a deeper stretch. A shin angled closer to your body reduces the intensity. Choose the angle that produces a firm stretch in your right buttock without sharp pain in your right knee.
- Extend your left leg straight behind you. The top of your left foot rests on the floor. Your left kneecap faces directly downward.
- Square your hips toward the front of the mat. Both hip bones should point forward as evenly as possible. If your right hip lifts significantly off the floor, place a folded blanket or yoga block under the right side of your pelvis. Supporting your hip allows your muscles to relax into the stretch rather than bracing against the imbalance.
- For the first minute, stay upright with your hands on the floor beside your hips. This lighter version allows your body to adjust to the stretch gradually.
- For a deeper stretch, walk your hands forward and lower your torso toward the floor. Rest on your forearms or lower your chest all the way down, extending your arms in front of you. This forward fold intensifies the piriformis stretch and adds a gentle spinal elongation.
- Hold for 1 to 3 minutes. The deep hip rotators require sustained holds to release effectively. Fascia begins responding to sustained pressure after approximately 90 seconds. Two to three minutes produces the most significant tissue change.
- To release, walk your hands back. Press into your hands. Slide your right leg back to tabletop position.
- Repeat on the left side. Hold for the same duration.
Modifications
- If you feel pain in your front knee: The knee discomfort usually comes from the rotational force on the knee joint when the hip is not flexible enough to accommodate the shin angle. Bring your front foot closer to your groin (reducing the shin angle). If pain persists, switch to the supine figure-four stretch: lie on your back, cross your right ankle over your left knee, and pull your left thigh toward your chest. This achieves the same piriformis stretch without any knee stress.
- If your hips are very tight: Place a yoga block, bolster, or thick folded blanket under your right hip. This prop fills the gap between your hip and the floor and allows your weight to rest comfortably. Without the prop, your muscles brace against the imbalance instead of releasing.
- If you have knee injuries: Use the supine figure-four modification described above. This is the standard physical therapy version of the piriformis stretch and places zero load on the knee joint.
Cobra Pose
Bhujangasana
Cobra Pose is the progression from Sphinx Pose. The greater degree of spinal extension in Cobra strengthens the erector spinae more aggressively and provides a deeper stretch to the anterior structures of your spine, including the abdominal muscles, the anterior longitudinal ligament, and the hip flexors.
Cobra differs from Sphinx in one critical way: your hands replace your forearms as the base of support. This allows you to control the depth of extension precisely. You press into your hands as much or as little as needed. This adjustability makes Cobra suitable for a wide range of ability levels when practiced with proper form.
The pose strengthens the posterior chain muscles that maintain upright posture. A study using EMG in the Journal of Strength and Conditioning Research measured muscle activation during Cobra Pose and found significant engagement in the erector spinae (57% MVC), gluteus maximus (28% MVC), and posterior deltoids (32% MVC). The thoracic erector spinae showed the highest activation, making Cobra particularly effective for correcting thoracic kyphosis (rounded mid-back).
Cobra also stretches the pectoralis major and minor muscles across the front of your chest. Tight pectorals pull your shoulders forward into a rounded posture. This forward shoulder position creates a chain reaction of compensatory tension through your upper back, mid-back, and lower back. Opening the chest in Cobra interrupts this chain and allows your shoulders to return to a neutral, retracted position.
The abdominal stretch in Cobra benefits people with chronic abdominal bracing. Many back pain sufferers develop a habit of over-tightening their core muscles throughout the day in an attempt to protect their spine. This constant bracing restricts breathing, compresses the lumbar spine, and creates its own form of muscle fatigue and pain. Cobra provides a counterstretch that releases the abdominal wall and restores normal breathing mechanics.
How to Perform Cobra Pose
- Lie face down on your mat. Extend your legs behind you, hip-width apart. The tops of your feet rest on the floor. Press all ten toenails into the mat.
- Place your hands flat on the floor directly under your shoulders. Spread your fingers wide. Hug your elbows close to your ribcage. Your elbows should point straight back, not out to the sides.
- Press the tops of your feet, your thighs, and your pubic bone firmly into the floor. These three points of contact anchor your lower body and prevent your lower back from taking all the extension load.
- On an inhale, begin straightening your arms to lift your chest off the floor. Straighten only to the degree where you maintain contact between your pubic bone and the floor. This is your limit for the pose. Going higher lifts your pelvis and dumps excessive compression into your lower lumbar segments.
- Draw your shoulder blades together and down your back. Broaden across your collarbones. Lift your sternum (breastbone) forward and up.
- Keep your gaze forward or slightly upward. Do not throw your head back. Your neck should extend as a natural continuation of your spinal curve, not as an isolated crank.
- Distribute the backbend across your entire spine. You should feel a gentle curve from your tailbone through your lower back, mid-back, upper back, and neck. If all the bending concentrates in your lower back, you have pressed up too high. Lower slightly and focus on lifting through your mid-back and chest.
- Hold for 15 to 30 seconds. Breathe steadily. Lower slowly on an exhale.
- Repeat 3 to 5 times.
Modifications
- Baby Cobra: Keep your hands on the floor but do not press up. Lift your chest using only your back muscles, with your hands lightly touching the floor for balance. This version builds pure back extensor strength without any arm assistance. Your hands provide feedback but not force.
- If your lower back feels compressed: Lower the height of your lift. Press up only 2 to 3 inches. Micro-extensions produce the disc migration benefit and build strength without overloading the facet joints.
- For more challenge: At the top of the pose, hover your palms 1 inch off the floor. This forces your back muscles to support the full extension without arm assistance. Hold for 5 seconds. Lower your hands. Lower your body. This isometric hold builds significant erector spinae endurance.
Legs-Up-the-Wall Pose
Viparita Karani
Legs-Up-the-Wall is the most restorative pose on this list. The pose requires zero muscular effort and produces measurable physiological changes within minutes. For people whose back pain is worsened by stress, fatigue, or prolonged standing, this pose provides immediate relief through passive decompression and nervous system regulation.
When you elevate your legs above your heart, gravity reverses the fluid dynamics in your lower body. Blood and lymphatic fluid that have pooled in your legs and feet during the day drain back toward your core. This venous return reduces swelling in the lower extremities and decreases the workload on your heart. The baroreceptors in your carotid arteries detect the increased central blood volume and signal your brainstem to reduce heart rate and blood pressure. A study in the Journal of Bodywork and Movement Therapies confirmed that the legs-elevated position reduced heart rate variability in a pattern consistent with increased parasympathetic dominance within 5 minutes.
For your back specifically, the pose eliminates gravitational compression. Standing and sitting load your lumbar discs with 100% and 140% of body weight, respectively (according to Nachemson’s classic intradiscal pressure studies). Lying supine with legs elevated reduces intradiscal pressure to approximately 25% of standing load. This reduction allows compressed discs to rehydrate and swollen tissues surrounding the spine to drain excess fluid.
The pose also stretches the hamstrings passively. With your legs resting against the wall, gravity pulls your thighs toward your torso, creating a gentle hamstring stretch without requiring any effort or muscular engagement. For people whose back pain worsens with active stretching (where the effort of stretching creates its own tension), this passive approach is ideal.
A study published in the Journal of Clinical Nursing tested the effects of the legs-elevated position on 60 patients after surgery. The intervention group showed significant reductions in pain, anxiety, and blood pressure compared to the control group. While the study population was post-surgical, the physiological mechanisms apply equally to chronic back pain sufferers.
How to Perform Legs-Up-the-Wall
- Sit sideways next to a wall with your right hip touching the wall surface.
- In one movement, swing your legs up the wall as you lower your back to the floor. Scoot your hips as close to the wall as comfortable. Your buttocks do not need to touch the wall. A gap of 2 to 6 inches is fine and allows your lower back to rest in a comfortable position.
- Your legs rest against the wall with your feet relaxed. Let your feet fall slightly apart. Do not flex your feet or point your toes. Complete relaxation is the goal.
- Extend your arms out to the sides at a 45-degree angle from your body, palms facing the ceiling. This open arm position stretches the pectoral muscles and allows your rib cage to expand fully during breathing.
- Close your eyes. Allow your entire body weight to release into the floor. Scan from your feet to your head and consciously release any area holding tension. Common holding spots include the jaw, the area between the eyebrows, the tops of the shoulders, and the hip flexors.
- Breathe naturally. Do not try to control your breath. Let the breath settle into its own rhythm. As the parasympathetic nervous system activates, your breathing will naturally slow and deepen without conscious effort.
- Hold for 5 to 15 minutes. Longer holds produce deeper relaxation. Set a gentle timer if you tend to fall asleep (falling asleep in this position is safe but the pose works best with conscious awareness).
- To come out, bend your knees toward your chest. Roll to one side and rest in a fetal position for 3 to 5 breaths. Press up to a seated position slowly. The gradual transition prevents dizziness from the shift in blood pressure.
Modifications
- For lower back support: Place a folded blanket or a thin pillow under your sacrum. This slight elevation tilts your pelvis into a comfortable position and increases the feeling of lumbar release.
- If your hamstrings are very tight: Move your hips 6 to 12 inches from the wall. Bend your knees slightly. The further your hips are from the wall, the less intense the hamstring stretch. Find the distance where you feel a mild stretch without discomfort.
- If you do not have a wall: Lie on your back and place your calves on the seat of a chair, couch, or bed. Your knees and hips should both be at approximately 90 degrees. This chair-supported version provides the same venous return, decompression, and parasympathetic benefits.
- For additional hip opening: Once settled against the wall, open your legs into a wide V-shape. Let gravity pull your legs apart. This adds an adductor (inner thigh) stretch to the restorative position. Use the stretch only if comfortable. Do not force the spread.
Build Your Back Pain Routine
Ten poses are on this list. For daily maintenance, you do not need all ten. A focused 15-minute routine using four or five poses provides substantial relief when practiced consistently.
For general back stiffness from sitting: Cat-Cow (1 minute) + Downward Dog (1 minute) + Bridge Pose (2 minutes) + Child’s Pose (1 minute) + Legs-Up-the-Wall (5 to 10 minutes). This sequence takes 10 to 15 minutes and addresses the three primary effects of prolonged sitting: disc compression, hamstring tightness, and glute inhibition.
For lower back pain with leg symptoms: Sphinx Pose (2 minutes) + Pigeon Pose (2 minutes each side) + Supine Twist (1 minute each side) + Legs-Up-the-Wall (10 minutes). This sequence targets disc mechanics, piriformis tension, and nerve compression, the most common causes of back pain radiating into the leg.
For upper back and postural pain: Cat-Cow (1 minute) + Cobra Pose (2 minutes) + Downward Dog (1 minute) + Standing Forward Bend (1 minute) + Child’s Pose (2 minutes). This sequence opens the chest, strengthens the thoracic extensors, and releases the fascial tension created by forward-head posture and rounded shoulders.
For acute pain relief: Child’s Pose (2 minutes) + Supine Twist (1 minute each side) + Legs-Up-the-Wall (10 to 15 minutes). When your back is in crisis, gentle is better. These three poses require minimal effort, create no additional compression, and activate your parasympathetic nervous system to interrupt the pain-spasm cycle.
Timing matters. Practice your chosen routine at the same time each day. Morning practice addresses overnight stiffness and prepares your spine for the day. Evening practice decompresses the accumulated load of the day and improves sleep quality. If you practice only once daily, choose the time when your symptoms are worst.
Consistency matters more than duration. Ten minutes daily produces better results than 60 minutes once a week. The research is clear on this point. A study in the journal Pain found that daily home yoga practice of 10 to 20 minutes produced outcomes equivalent to supervised weekly classes for chronic low back pain. The daily repetition retrains your neuromuscular patterns and prevents the re-tightening that occurs between infrequent sessions.
Your back pain developed over months or years of accumulated posture, movement habits, and stress. Reversing these patterns takes time. Commit to 4 weeks of daily practice before evaluating your results. Most people notice reduced pain within the first 2 weeks and meaningful functional improvement by week 4.